Configure batch export
Portfolio Service Batch Export Tables" module or "Portfolio Service Scheduled Reporting" module
Proceed as follows to edit or create batch export configurations:
- Select the "Batch export" icon on the "Reporting" tab in the ribbon.
The "Batch export" worksheet opens in the evaluation area.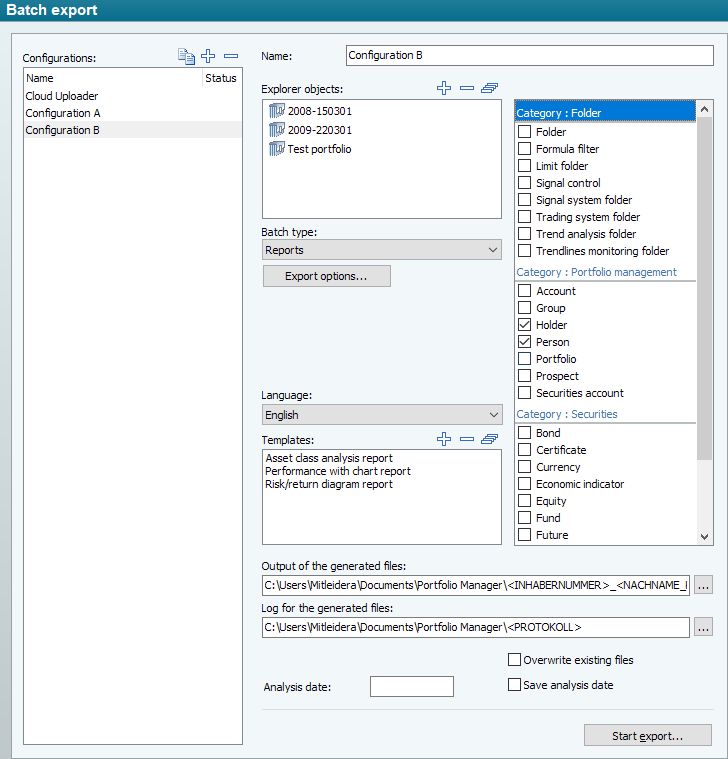
Make your settings here. Read the following subsections on the individual areas of the worksheet. - Add your batch export configurations in the left-hand area of the worksheet or select the ones you want to edit.
- Enter a name for the configuration in the "Name" input field.
- Add the desired owners in the "Explorer objects" area.
- Then select the batch type using the selection list.
- In the "Templates" area, you then select the templates - reports, report folders or tables - depending on the selected batch type.
The selection of batch types and templates depends on the licensed modules. If the "Batch export tables" module is licensed, tables can be selected here. If the "Portfolio Service Scheduled Reporting" module is licensed, reports and report folders can be selected here. - For reports and report folders, select the reporting language for the batch export in the "Language" selection list. The priorities explained in the section Selecting languages for reporting apply. For example, the reporting languages configured in a report folder for the individual reports are also taken into account during batch export.
- If necessary, check the export options for the selected batch type.
- On the right-hand side of the worksheet, select the objects for which a configuration should be available. To do this, activate the checkboxes for the objects.
- In the "Output of created files" and "Log of created files" sections, you can specify the paths and file names for the files.
- Save the configuration (and all other changed configurations) using the FILE, SAVE command, the "Save" icon in the quick access toolbar or the key combination <CTRL>+<S>.
- You can enter an evaluation date in the "Evaluation date" input field for batch exports to be started manually via the "Start export..." button. You can save the entered date by activating the "Save evaluation date" checkbox. The default setting is the current date.
- If you want to overwrite existing files with the same name in the target folder, activate the "Overwrite existing files" checkbox.
- You can now start the batch export - either via a corresponding job or manually via the "Start export..." button.
Read the section Start batch exportfor information on the various options for executing batch exports.
If you have licensed an external mailbox and have also activated the uploading of documents to this mailbox for the persons concerned, the "Set up message..." button will appear in the worksheet for the "Reports" and "Report folders" batch types (or "Edit message..." for messages that have already been set up), which you can use to configure a message for export.
If necessary, read the section External mailboxes in the Postbox help.
Siehe auch: