Record purchase
Buy and sell (securities account) transactions are the most important transaction types in this category, and the Infront Portfolio Manager takes a large part of the work out of recording them. Always remember that the data you enter will be available to you for subsequent evaluations. You will soon realize that it pays to enter the bookings conscientiously and in every detail. Especially if you attach importance to a precise yield statement.
It is of course sufficient to enter the transactions here. The Infront Portfolio Manager automatically makes the necessary changes to the securities accounts and accounts.
If you have licensed the "Cost service" module and have an Internet connection to the service, you can also download the associated purchase costs directly from the cost service.
Before you start recording your own transactions, you should definitely take a look at some examples first and experiment a little!
Depots with sample data for testing are already included in the scope of delivery of the Infront Portfolio Manager.
To enter a purchase, proceed as follows:
-
Open the "Enter transactions" worksheet as described above in the section Enter transactions and select the desired holder if necessary.
-
Open the DEPOT menu in the "Enter transactions" worksheet.
-
Select the transaction type PURCHASE at Depot transaction types .
Use the keyboard to enter a purchase with the "Enter transactions" worksheet open as follows: Press the key combination <CTRL>+<1> for the securities account transaction types. Then press the button<B>.
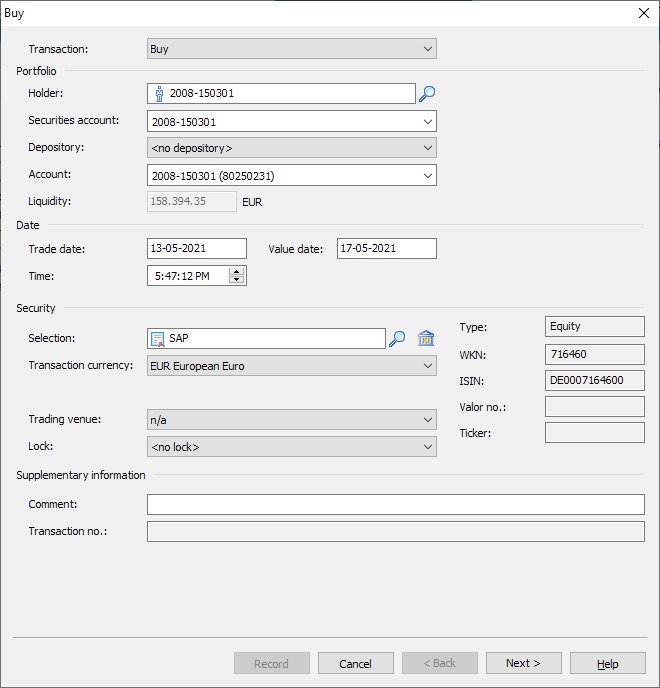
The "Purchase" dialog box appears.
-
Complete or change the information in the fields if necessary. The details of these fields can be found in the following table.
The fields in detail:
Element
Description
Transaction
Purchase.
Here you can enter the following other transaction types or select them from the selection list without leaving the dialog box:
Sale, final maturity, redemption, delivery, splitting, bonus shares, par value conversion, subscription right discount and pool factor repayment.
Holder
Currently selected owner.
You can enter a different owner here or use the "Search" icon to the right to search and select using the object search.
Depot
Currently selected securities account of the holder.
If necessary, select another securities account from the selection list.
The selection list of portfolios is grouped by portfolio.
Storage location
If you have selected a security that you would like to assign to a specific storage location, you can select this storage location in the "Storage location" selection list in accordance with the storage locations created under DATA MAINTENANCE, DETECT STORAGE LOCATIONS.
It is not possible to select a depository for options and futures.
You can find out more about this topic in the chapter Storage locations.
Account
Currently selected account.
Keep the default setting (the default settlement account of the custody account) or select the relevant account from the list.
The selection of accounts is limited to all accounts of the custody account holder and grouped by portfolios. You can see the account numbers in brackets after the account names.
You can search for the desired account by entering an account number and select it from the list using the <RETURN> button. Please note that if you exit the field without selecting an account (e.g. by pressing the <TAB> button), any text input is ignored and the old selection is retained.
Liquidity
The current level of liquidity in the currently selected account is displayed as information.
Final day
Enter the closing date of the transaction here.
You can define the preallocation via the general depot settings. The default setting is the day before the current day. If necessary, read the section Securities account settings - Transaction entry.
Time
Enter the exact time of purchase here. Stating the exact time of a transaction has been important since MiFID came into force.
The current time is set as the default setting.
Value date
Enter the value date here - the value date.
You can define the preallocation via the general depot settings. The default setting is 2 working days after the closing date for Germany and 3 working days after the closing date for Switzerland. If necessary, read the section Securities account settings - Transaction entry.
Securities selection
Enter the name of the security for which the selected transaction is to be executed and press <RETURN> or select the "Search" icon to search for the security using the object search.
You can also enter part of the name and then click on the "Search" icon or press the <RETURN> key. The securities found are then listed in the object search. Select the one you want to buy there.
Security objects are always required for transactions. Use storage locations to differentiate stock. The valuation of securities positions is always based on one and the same valuation price quotation.
Select a security from the securities portfolio
You can use this function to quickly select securities from the securities account specified above (and the depository, if applicable).

Transaction currency
Select the transaction currency here.
The default setting is the default currency from the global settings.
In the "Settings" dialog box on the "Securities account" tab, you can also specify that the settlement currency from the WM master data is used as the default value for the transaction currency.
Trading center
From this list you can select the trading center where you bought the security. The trading venue is stored with the order for information purposes (regardless of the venue stored in the security) and is another MiFID requirement.
Lock
If necessary, select the block that should apply to this transaction (number of units). If a transaction is blocked, the items are blocked or unblocked here. However, blocks in the Infront Portfolio Manager are purely informative and do not prevent transactions.
In the securities account transaction types, you will also find the "Block" transaction type for blocking securities without a specific underlying transaction.
Remark
You can enter any text here (max. 50 characters).
Transaction number
If the transaction comes via a Portfolio Sync Interface, you will see the transaction number here, which is used to identify the transactions.
Messages
Plausibility checksDepending on your personal configuration, plausibility checks may run in the background when transactions are entered. Corresponding messages are then displayed above the buttons.
Example: "Warning: A trading venue must be assigned to the transaction."
To see all other messages, point to the message with the mouse. To see the detailed test results, click on the message.
In these cases, correct your entries before completing the transactions.
Read the section on plausibility checks.
Cancel
Select this button to close the dialog box without saving the entries.
Next
This button takes you to the next "page" of the "Purchase" dialog box.
Help
Select this button to open the context-sensitive online help.
You can also see the type, valuation currency, WKN, ISIN, security number and ticker of the security as information in the dialog windows for entering transactions on the right. -
Confirm the first page of the dialog box with "Next".
The second page appears, on which you enter the further details of the transaction. At the top you will find the information transferred from the first page of the dialog window (holder, custody account, account, security...).
If you have licensed the "Cost service" module and have an Internet connection to the service, you can download the associated costs of the purchase directly from the cost service using the corresponding button.Record purchase without cost service
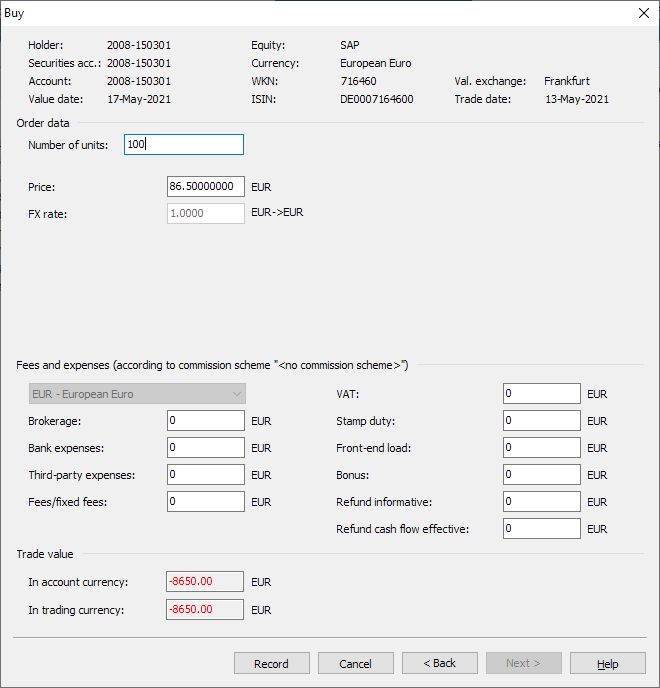
Make sure that all entries match the details on your bank statement.
The fields in detail:
Element
Description
Quantity
Enter the desired number here.
Depending on the security type, enter the number of units (e.g. shares), the nominal value (e.g. bonds with a price factor of 100) or the number of contracts (options and futures) here.
In the lower fields you can immediately see the amount in account and trading currency.
Course
The Infront Portfolio Manager specifies the price of the security valid on the order date. If you have received a different price, for example in variable trading, change the price accordingly. Up to 8 decimal places can be entered here.
The redemption price is always shown here for funds. The issue surcharge appears separately in the fees on the right-hand side of the dialog window.
For index-linked bonds, the market price is shown here without offsetting the ratio.
Exchange rate
The Infront Portfolio Manager specifies the exchange rate (fixing) valid on the order date. If you have received a different exchange rate, change the rate accordingly.
If necessary, change the course in the selection field to the right. The default setting here is the exchange rate: Currency of the security to currency of the account.
A special case is the constellation of securities in US dollars (USD) and accounts in euros (EUR), as the default setting is adapted to existing (banking) conventions: EUR -> USD.
Interim profit
Only for funds.
The interim profit for funds on this date is entered here.
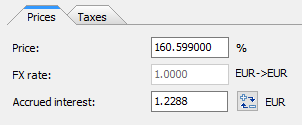
Accrued interest
Only for bonds.
The accrued interest for bonds on this date is entered here.
Pool factor
Only for bonds.
The percentage value is entered here for pool factor bonds.
Index ratio
Only for bonds.
The index ratio is entered here for index-linked bonds.
Read about the features of index-linked bonds in the section Bond master data.
Expenses and fees
The commission scheme on which the expense calculation is based is shown in brackets.
Please also read the section Commission scheme.
Selection list "Currencies"
If the transaction currency and account currency are different, you can select here whether the charges and fees are to be displayed in the trading currency or in the account currency.
Brokerage fee
The Infront Portfolio Manager automatically calculates a brokerage fee according to the specifications in the securities account master data. If the brokerage fee on your statement differs from the brokerage fee calculated by the Infront Portfolio Manager, you can overwrite the value manually.
Bank charges
Your Infront Portfolio Manager automatically calculates the fees using the commission scheme stored in the securities account. If the expenses on your statement differ from the expenses calculated by the Infront Portfolio Manager, you can change the field manually.
External expenses
Enter the foreign charges in account currency here.
Third-party fees are also determined automatically by the commission scheme. However, you can also overwrite them manually if required.
Fees/fixed amount
The Infront Portfolio Manager calculates the fees automatically using the commission scheme stored in the securities account. If the fees on your statement differ from the fees calculated by the Infront Portfolio Manager, you can overwrite this value manually.
Value added tax
The VAT rate is stored in the global settings.
Stamp duty
Amount of stamp duty payable in Switzerland.
This record is maintained via the global settings. If necessary, read the section General securities account settings.
Issue premium
If applicable, enter the amount of the front-end load for this (fund) purchase here.
Issue premiums increase the amount payable.
Bonus
If applicable, enter the amount of the bonus for this (fund) purchase here.
Bonuses reduce the amount payable.
Reimbursement informative
If applicable, enter the amount of the informative (non-cash flow) reimbursement for this purchase here.
With the entry into force of MiFID II , rebates will always be passed on to the end customer, meaning that rebates will always affect cash flow in future.
Reimbursement affecting cash flow
Enter the amount of the cash flow effective reimbursement for this purchase here.
Amount in account currency
Shows the amount outstanding in the currency of the account.
The amount payable includes any expenses, fees and taxes.
Amount in trading currency
Shows the amount outstanding in the currency of the security.
Messages
Plausibility checksDepending on your personal configuration, plausibility checks may run in the background when transactions are entered. Corresponding messages are then displayed above the buttons.
Example: "Warning: The "Trading center" field must be filled."
To see all other messages, point to the message with the mouse. To see the detailed test results, click on the message.
Read the section on plausibility checks.
Back
This button takes you back to the "first page" of the dialog box.
Cancel
Select this button to close the dialog box without saving the entries.
Capture
If all entries are complete and correct, select this button to enter the order.
Before finally entering the transaction, be sure to note the messages from the plausibility checks.
Help
Select this button to open the context-sensitive online help.
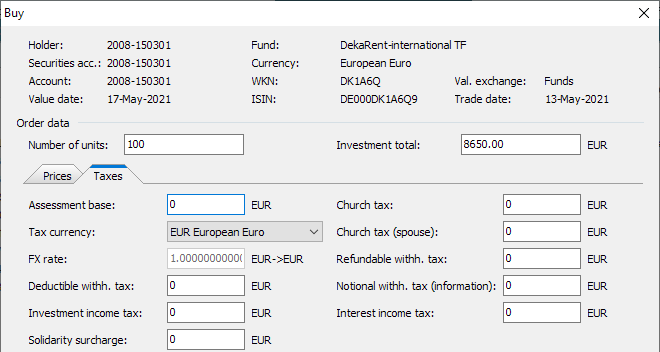
For bonds and funds, all tax-relevant fields are also required for purchases due to interim profit or accrued interest. In this case, the assessment basis is the interim profit or accrued interest converted into the tax currency.
The tax details largely correspond to those for recording income from securities. You can access the data by clicking on the "Taxes" mini-tab on the second page of the "Purchase" dialog box.
-
Confirm the entries with the "Enter" button.
Record purchase with ongoing cost service

The fields in detail:
|
Element |
Description |
|---|---|
|
Quantity |
Enter the desired number here. Depending on the security type, enter the number of units (e.g. shares), the nominal value (e.g. bonds with a price factor of 100) or the number of contracts (options and futures) here. In the lower fields you can immediately see the amount in account and trading currency. |
|
Course |
The Infront Portfolio Manager specifies the price of the security valid on the order date. If you have received a different price, for example in variable trading, change the price accordingly. The redemption price is always shown here for funds. The issue surcharge appears separately in the fees on the right-hand side of the dialog window. For index-linked bonds, the market price is shown here without offsetting the ratio. |
|
Exchange rate |
The Infront Portfolio Manager specifies the exchange rate (fixing) valid on the order date. If you have received a different exchange rate, change the rate accordingly. If necessary, change the course in the selection field to the right. The default setting here is the exchange rate: Currency of the security to currency of the account. A special case is the constellation of securities in US dollars (USD) and accounts in euros (EUR), as the default setting is adapted to existing (banking) conventions: EUR -> USD. |
|
Interim profit |
Only for funds. The interim profit for funds on this date is entered here. |
|
Accrued interest |
Only for bonds. The accrued interest for bonds on this date is entered here. |
|
Pool factor |
Only for bonds. The percentage value is entered here for pool factor bonds. |
|
Index ratio |
Only for bonds. The index ratio is entered here for index-linked bonds. Read about the features of index-linked bonds in the section Bond master data. |
|
Edit costs (service)" button |
Select this button to edit the cost items for this purchase in the "Edit cost items (cost service)" dialog box that appears. If necessary, read the section Transactions and cost service. |
|
Amount in account currency |
Shows the amount outstanding in the currency of the account. The amount due also includes the costs recorded via the cost service. |
|
Amount in trading currency |
Shows the amount outstanding in the currency of the security. |
|
Messages
|
Depending on your personal configuration, plausibility checks may run in the background when transactions are entered. Corresponding messages are then displayed above the buttons. Example: "Warning: The "Trading center" field must be filled." To see all other messages, point to the message with the mouse. To see the detailed test results, click on the message. Read the section on plausibility checks. |
|
Back |
This button takes you back to the "first page" of the dialog box. |
|
Cancel |
Select this button to close the dialog box without saving the entries. |
|
Capture |
If all entries are complete and correct, select this button to enter the order. Before finally entering the transaction, be sure to note the messages from the plausibility checks. By entering, you also save the cost structure of this transaction with the values currently entered in the cost service.
|
|
Help |
Select this button to open the context-sensitive online help. |
Special feature of options and futures: Long and short
With options and futures, it is also common to go short. It is also possible to be short and long with the same option or future at the same time. When entering options and futures, you now have the option of specifying "Long" or "Short" by activating the options of the same name in the "Purchase" dialog box.
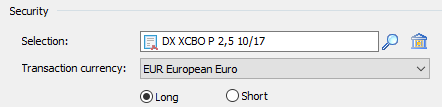
Together with the purchase and sale transaction types, this results in the following 4 options:
|
Opening long |
Purchase with long marker |
|
Closing long |
Sale with long marker |
|
Opening short |
Sale with short marking |
|
Closing short |
Purchase with short marking |
Accordingly, the balance sheet is able to show separate holdings (long, short) for the same security.
Purchase of index-linked bonds
If the bond to be purchased is an index-linked bond, the "Price" field in the "Purchase" dialog box shows the market price without offsetting the index ratio. The "Accrued interest" field shows the accrued interest actually paid or payable (i.e. with the index ratio calculated).
Read about the features of index-linked bonds in the section Bond master data.
Entry of negative accrued interest
When entering the purchase of a bond, you have the option of entering negative accrued interest in the Infront Portfolio Manager. As this only makes sense for rare, rather exotic exceptions, the associated function is called "Logic reversal".
You will find the "Logic reversal" icon to the right of the input field for accrued interest on the second page of the "Purchase" dialog box when purchasing a bond. The result in these cases is positive accrued interest income.
You can recognize the activated logic reversal after clicking on the "Logic reversal" icon by the red colouring of the "Accrued interest" input field.
Ensure that the logic is set correctly. Normally you do not need to change anything here. The logic for accrued interest is reversed if the "Accrued interest" input field is colored red.
Entry of negative interim profits
When entering the purchase of a fund, you have the option of entering negative interim profits in the Infront Portfolio Manager. This only makes sense for a few, rare transactions. The associated function is called "Logic reversal".
![]()
Ensure that the logic is set correctly. Normally you do not need to change anything here. The logic for interim profits is reversed if the "Interim profit" input field is colored red.
Investment amount
When entering a fund purchase, the "Purchase" dialog box offers the option of entering the investment amount instead of the nominal value. The investment amount corresponds to the market value and affects the price during processing, but is otherwise only an informative value that is not saved.
If the fees are all 0, the investment amount corresponds to the amount to be paid.