Configure plausibility checks
Portfolio service plausibility check" module
If you have the "Configure plausibility profile" system right, you can configure your plausibility checks individually: Activate and deactivate checks or partial checks or increase the priority of checks.
Proceed as follows:
- On the "Configuration" tab, select the PLAUSIBILITY CHECKS command in the menu of the "Further configurations" icon.
The "Configure plausibility checks" dialog box appears.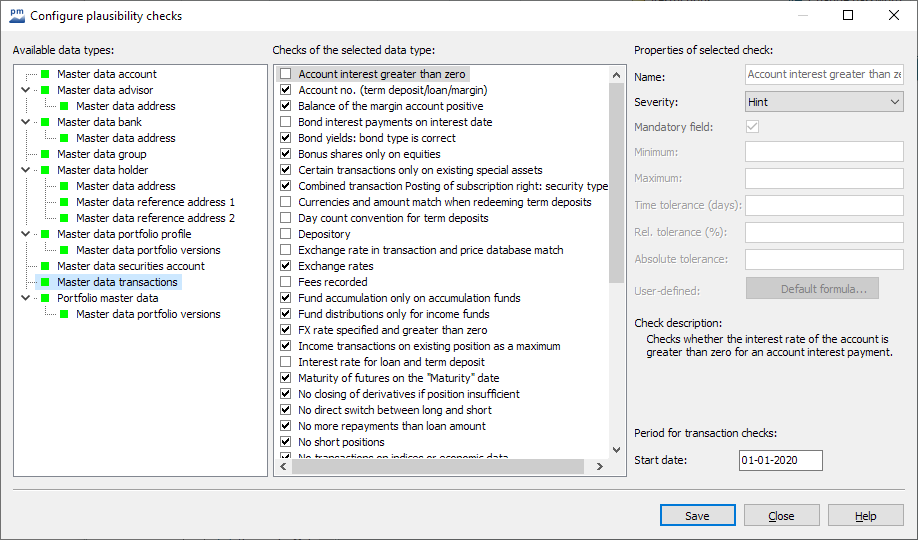
- Select the desired data types in the left-hand column of the available data types.
The individual checks for the currently selected data type are then displayed in the middle. The details of the selected test are shown on the right - e.g. name, severity and a description. - Activate or deactivate the desired checks using the checkboxes in front of the check names.
- Assign the desired severity level to the activated checks using the selection list on the right-hand side.
- Make the other settings, details of the options can be found in the following table.
- Save the configuration with the "Save" button.
- Finally, close the dialog box with the "Close" button.
In detail, the "Configure plausibility checks" dialog box contains the following elements and options:
| Element | Description |
|---|---|
List of available data types | In this list on the left-hand side of the dialog window, all known data types are displayed in a tree structure. The colored markings indicate this:
|
Checks of the selected data type | In this middle area, the associated checks are listed for the selected data type. If a data type has subordinate data types, only the checks of the data type itself are listed, but not the checks of the subordinate data types. If you activate the checkbox for a check, the status changes from "inactive" to "active". Alternatively, you can also press the <SPACE> key to activate the currently selected test. Similarly, deactivate active checks. You can activate all checks of the selected data type via the context menu of the checks using the SELECT ALL command. Use the DISABLE ALL command to deactivate all checks of the selected data type except for the checks with a severity level of "Critical", which cannot be deactivated. Their checkboxes are grayed out. This only applies to particularly important tests that check conditions that are absolutely necessary. Beispiel The name of an owner. |
Data of the selected test (You configure the selected check on the right-hand side of the dialog box) | |
| Element | Description |
Name | Name of the currently selected exam. |
Severity | Severity or priority of the currently selected check. Select the severity level (note, warning, error). The severity of the check determines where a problem that occurs during the check appears in the results list (errors are at the top) and also determines the graphical display of the result. If it is a non-configurable check (i.e. one with a grayed-out checkbox), the severity level is "Critical" and cannot be changed. |
Mandatory field | If this checkbox is deactivated, a mandatory field check is only carried out if the corresponding field contains a value. If it is activated, a check is always carried out. Mandatory field checks with the severity level "Critical" cannot be processed. |
Minimum Maximum | Here you have the option of specifying minimum and/or maximum values or lengths for suitable tests and thus defining a tolerance range. |
Time tolerance (days) | Enter the number of days here. The time tolerance in days is the number of days for which the interest payment is next to the interest payment date, e.g. for the "Bond interest payments on interest payment date" test, without the test being triggered. |
Relative tolerance (%) | Enter the percentage tolerance upwards and downwards here. Beispiel In the plausibility check "Rates in transaction match rates from rate system", 3% deviation upwards and downwards is permitted without the test failing. |
Absolute tolerance | Enter the tolerance upwards and downwards in absolute values here. Beispiel In the plausibility check "Rates in transaction match rates from exchange rate system", a deviation of 3 monetary units (e.g. "EUR") upwards and downwards is permitted if "3" is entered without the test failing. |
User-defined | The "Standard formula" button takes you to the formula editor, where you can store an individual formula for the check. Such a formula receives the field value as an input object and must return a string as the result object. An empty string means that the check has been passed - otherwise the supplied string is interpreted as an error message. |
Description | Detailed information on the test. |
Period for transaction checks | Especially for plausibility checks on transactions, you have the option of defining an evaluation interval here. To do this, enter the desired start date of the tests in the input field. Use the right mouse button to open the familiar context menu in the input field to quickly select frequently used times ("Today", "Yesterday", "Start of month", "Start of quarter"). The default setting is January 1 of the current year. |
| Buttons | |
Save" button | Select this button to save the current configuration. |
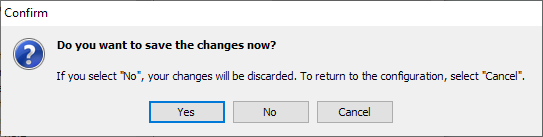
Close" button | Select this button to close the "Configure plausibility checks" dialog box. If you have made changes that have not yet been saved, a corresponding confirmation prompt appears:
Select the "Yes" button to save the changes. |
Help" button | Select this button to open the online help for the plausibility checks. |