Portfolio Service Scheduled Reporting" module
Once you have configured your Scheduled Reporting profiles and assigned them to the holders or portfolios, start Scheduled Reporting as follows:
-
In the menu ribbon on the "Reporting" tab, select the command RUN SCHEDULED REPORTING in the menu of the "Scheduled Reporting" icon.
-
In the open "Perform Scheduled Reporting" workspace, you have an overview of the current Scheduled Reporting settings.
-
Start reporting with the "Execute" button.
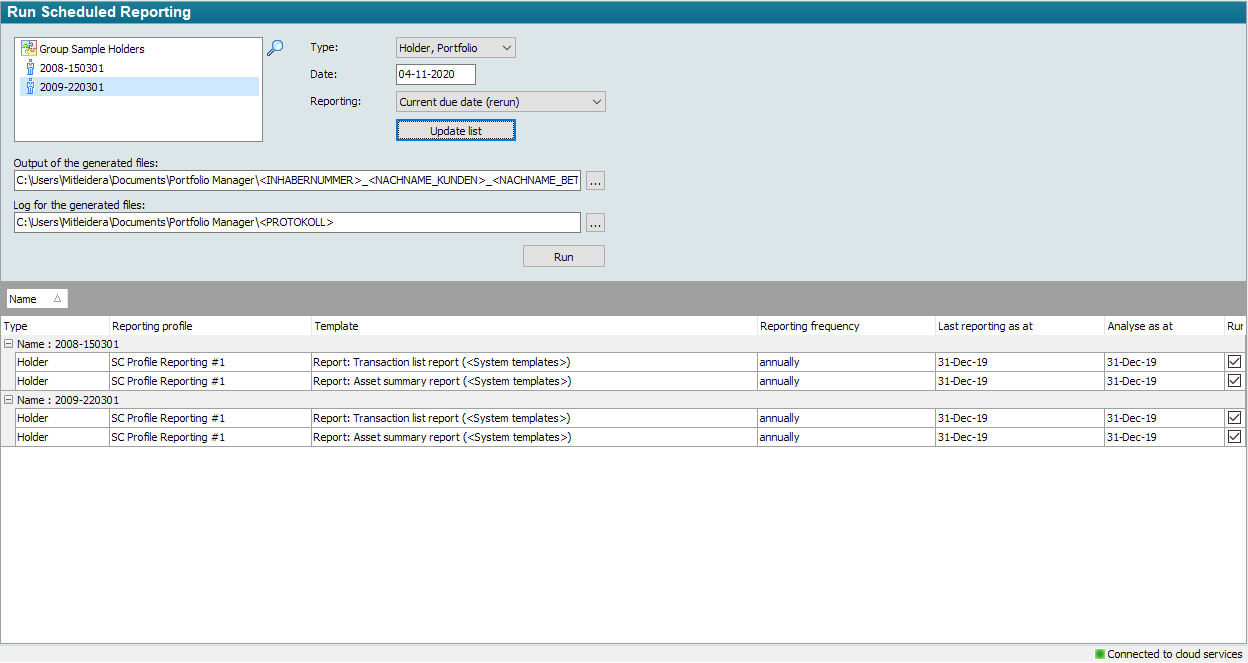
Similar to the functions and information described in the section Assigning scheduled reporting profiles via the ribbon , you will find the following elements in the "Perform scheduled reporting" workspace:
|
Element |
Description |
|---|---|
|
|
Select the "Search" icon to search for holders, portfolios, groups or securities account filters using the object search. Select the desired hits in the search result and confirm your selection with "OK". Or drag depot filters, groups, owners or portfolios directly from the Explorer into the input field. The selected objects are added to the input field. |
|
Type |
Select the desired type from the selection list:
|
|
Date |
Select the date on which the scheduled reporting should take place. |
|
Reporting |
Select the desired date for Scheduled Reporting from the selection list:
If you would like to carry out the current reporting even if it has already been carried out, select the entry "Current date (carry out again)". If you are in October 2019, use this setting to set the date in the "Evaluate as of" column for reporting profiles with the reporting frequency "annually" to 31.12.2018, even if this annual reporting has already been created. This also makes it possible to (re)run reports that lie further in the past. To do this, select the desired date in the past and then select this entry. In this case, reporting is carried out for the last complete interval before the selected date, i.e. the reporting that was current at that time. Select the "Next due date" entry to set the next reporting due date. In this way, you select a reporting whose interval end will be reached next - in relation to the current date or the set date. If you are in October 2019, use this setting to set the date in the "Evaluate as of" column for reporting profiles with the reporting frequency "annually" to 31.12.2019.
|
|
Update list" button |
Select this button to update the resulting list after selecting input objects or types. |
|
Output of the generated files |
Specify here the naming scheme for the files and where they should be saved. If you have changed the default labeling mask for the generated files, e.g. removed placeholders, you can restore the labeling scheme of the delivery status at any time using the <CTRL>+<R> key combination. The path itself remains unchanged. If you have selected a printer in the Scheduled Reporting configuration, this path specification does not apply. Please also read the section Output of the generated files in the chapter Batch export.
|
|
Log of the generated files |
Specify here where the log of the generated files should be saved. The default setting is the <Infront Portfolio Manager> folder in <My Documents>. The log contains, for example, information on the owner, template, storage location or printer and any errors that may have occurred. Please also read the section Log of the generated files in the Batch export chapter. |
|
Type" column |
The type of custody account object ("holder" or "portfolio"). |
|
Name" column |
The list is grouped by this column by default. In this column you can see the name of the respective deposit object. The table is grouped by this column by default. To remove the grouping, drag the "Name" column heading back to the desired position in the column headings. |
|
Reporting profile" column |
Here you can see the name of the reporting profile. |
|
Template" column |
All reports and report folders of the assigned reporting profiles are listed in this column. |
|
Reporting frequency" column |
Here you can see the current reporting frequency for this report or report folder. |
|
Column "Last reporting as of" |
Here you can see the date on which the Scheduled Reporting (for the currently set date) was last completed. |
|
Column "Evaluate for" |
Based on the set reporting frequency and the settings selected above, this date is the next evaluation day. |
|
Execute" column |
Activated by default. Deactivate the checkbox of the objects whose Scheduled Reporting you do not want to execute. |
Select the "Execute" button to start Scheduled Reporting with the selected settings.
The reports and report folders are stored in the directory selected under "Output of generated files".
Read in the section Saving reports in ZIP archiveshow you can summarize your reports in ZIP archives and provide them with a password.
If you create your own reports with the Report Designer, use the MM-Talk formulas EvaluationDate and StartEvaluationDate. You can use these functions to query the evaluation data transferred from Scheduled Reporting in the report.