To create a new macro, first open a new formula editor window with the command NEW, FORMULA-MACRO in the menu of the "Template" icon on the "Configuration" tab in the ribbon of the Infront Portfolio Manager or, if a formula editor window is already open, with the command FORMULA, NEW MACRO in the menu of the formula editor. Windows that are already open remain open (in the background).
You can recognize several open formula editor windows by the title bar of the window: Formula editor, Formula editor (1), Formula editor (2)..
The following steps are required to define a macro:
-
Enter the formula text in the editor (the usual MM-Talk syntax applies). If you use a user-defined macro in the new macro, the corresponding library must be integrated into the formula by moving it to the list of libraries used on the "Library" tab. More on this in the section Integrate libraries into macros.
-
Type the variables (see Configuration of the parameter dialogs) and define the default values.
-
All variables used in a macro are automatically defined as parameters. If necessary, define the desired sequence on the "Declaration" tab by selecting a parameter with the mouse and then moving it using the arrow buttons.
-
Specify the input type on the "Declaration" tab in the "Apply to" field. If this field remains empty, "Object" is automatically entered as the type.
-
Assign a macro name and specify in which library the new macro is to be included (both on the "Declaration" tab).
-
Enter a brief explanation of the macro on the "Description" tab. This is then displayed later as direct help for this macro.
-
Save the new macro.
![]()
In this example, a macro is created that returns a time series of all prices that have risen over n periods in the observation period.
The input object is a time series, the parameters are "N" for the number of periods and "period" for the entire observation period.
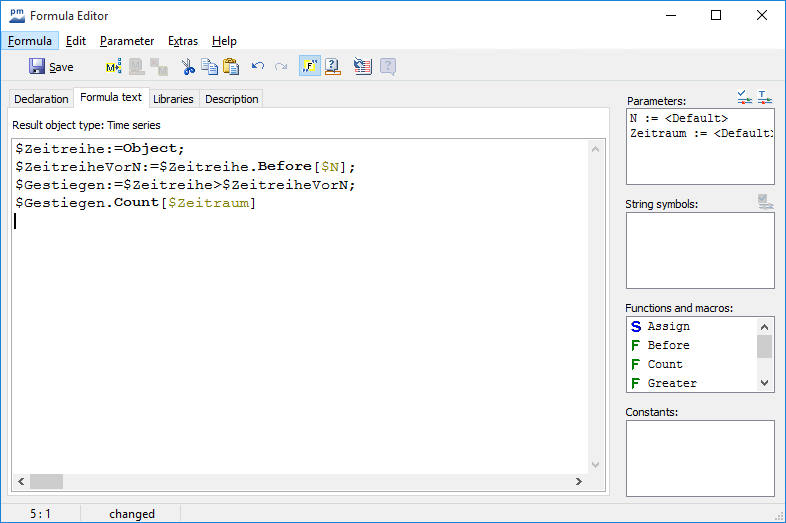
1. Enter formula text
A macro is to be used in other formulas and therefore expects an input ("Object"). This input object is stored in a variable. As this input object will be a time series, the name "$Time series" is selected.
$Zeitreihe:=Object;
You can of course choose the variable names freely. However, you can make the formula easier to read if you choose a descriptive name that shows what the variable is assigned to.
The values should be compared with the values before N periods. To do this, the time series is shifted by N periods into the past using the "Before[$N]" command. The result is saved in the variable "$TimeseriesBeforeN":
$ZeitreiheVorN:=$Zeitreihe.Before[$N]
It is now necessary to compare the times at which the value of "$Time series" is greater than the value of "$Time seriesBeforeN". The result is stored in the variable "$Gestiegen". This variable assumes the Boolean value "True" ("Yes" or "True") if "$Timeseries" is greater than "$TimeseriesBeforeN", otherwise it has the value "False" ("No" or "False").
$Gestiegen:=$Zeitreihe>$ZeitreiheVorN;
Finally, it must be counted how often the variable "$Increased" assumes the value "True" in the period N periods. The "Count[]" function is used for this purpose. The time period is used as a parameter for the function:
$Gestiegen.Count[$Zeitraum]
The complete formula is therefore:
$Zeitreihe:=Object;
$ZeitreiheVorN:=$Zeitreihe.Before[$N];
$Gestiegen:=$Zeitreihe>$ZeitreiheVorN;
$Gestiegen.Count[$Zeitraum]
No user-defined macros were used in this example, so you do not need to make any settings on the "Libraries" tab.
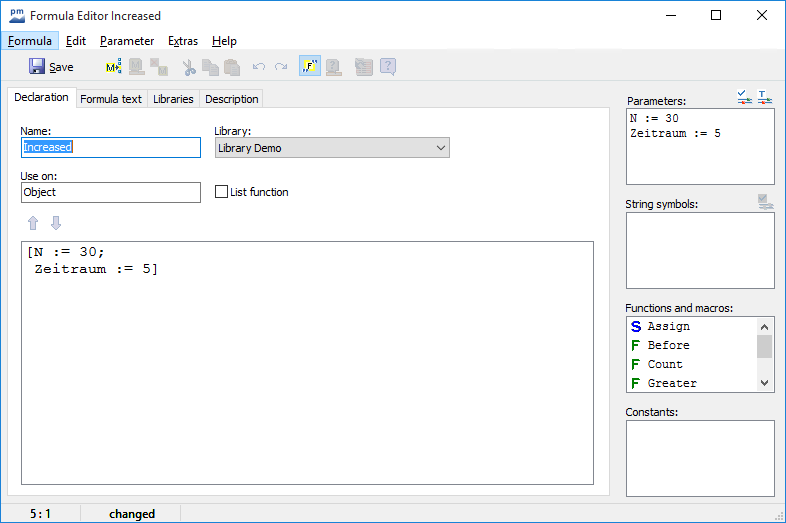
2. Typing variables and defining default values
The Infront Portfolio Manager types the variables automatically, so you do not normally need to make any changes here.
Unknown Attachment
![]()
Unknown Attachment
Try out which settings deliver good results and set these as the default value.
3. Set parameter sequence
It is advisable to sort the parameters according to their importance on the "Declaration" tab. In this case, for example, if you change the "$period" parameter more frequently than the "N" parameter, you should put the "$period" parameter first. Then you do not always have to assign the parameter "N" with an underscore "_" when using this macro, but can simply omit it. More on this in the section Default values.
4. Set input type
The input object of this formula is always a time series. Therefore, enter the type "Time series" in the "Apply to" field on the "Declaration" tab. If this field remains empty, "Object" is automatically entered as the type, i.e. the formula can then be applied to all object types.
5. Define macro names and library
Enter a name for the macro on the "Declaration" tab, e.g. "Increased".
Select a library from the list to which the macro is to be assigned, e.g. the user library.
6. Enter explanation
Enter a short explanation on the "Description" tab, e.g. "Provides all prices that have risen over n periods in the observation period".
7. Save
Save the newly created "Increased" macro. You can now use it in other formulas, e.g. to display an additional time series in a chart using the formula "Close[].Increased[]".
With this macro, you can also easily define a formula that only counts when the time series has fallen by negating the input object:
(-Object).Gestiegen[$N;$Zeitraum]