To change the display format of a column to "Pictures", select the DISPLAY, PICTURES command in the context menu of the column. For configuration, select the command PRESENTATION, FORMAT.
The "Display" dialog box appears, in which you can define the form of the text display. Select the "Images" display type.
Click on the "Picture list..." button on the "Pictures" tab. The "Edit images" dialog box opens.
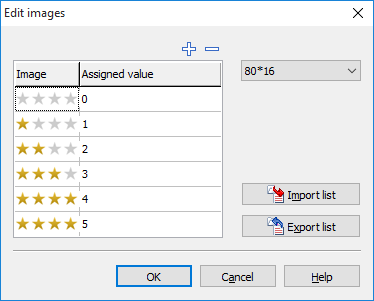
You can assign images and values to each other in the list on the left-hand side of the window:
-
To add an icon to the list, click in the "Image" column.
-

-
Select an image in a supported graphic format (e.g. tee, jpg, png, bmp, ico, emf, wmf) and then select the "Open" button. Make sure that the icon has the size selected on the right-hand side. Possible settings are:
-
16 x 16 pixels
Example:
-
32 x 16 pixels
-
64 x 16 pixels
-
80 x 16 pixels
Example:
-
-
The "Edit images" dialog box appears again. To assign a value to the icon, click in the "Assigned value" column and enter the desired number or character string.
-
Carry out steps 1-4 for all images. Confirm your settings with "OK" or select "Cancel" to discard the settings and close the dialog box.
![]()
You can save complete image lists. To do this, select the "Export list" button. You can call up a list saved in this way using the "Import list" function. Please note that unsaved images from the current view will be lost when importing a list.