Import objects
For a successful import, you must have the program version and the activated modules that are required for the objects to be imported.
Furthermore, you cannot import files into the Infront Portfolio Manager that were created or exported with program versions prior to version 5.0.
Proceed as follows to import MME files:
- Select the FILE, OBJECT IMPORT command in the ribbon.
The "Import objects" worksheet opens.
- Specify the folder under which you want to import the content. The default setting is the user's desktop. You can simply drag another folder into the "Target folder" field or select it using the object search, which you can start using the "Search" icon.
- If necessary, select the template zone for templates, asset definitions, libraries or activities to be imported. Select the primary zone in the selection list and add the secondary zones in which the objects are to be visible in the "Secondary zones" input field if necessary.
Read the section Structure of the user administration in the administration manual of your Infront Portfolio Manager if necessary.
If the "Show file content only" field is activated, the data is not imported directly. The file is only checked. Finally, the system displays what needs to be imported. - Then decide whether you want to import the objects, including any available zone information, into their respective zones. To do this, activate the "Import folder objects with zone information" checkbox. The import settings selected above are then ignored for these objects.
Please also read the section Importing objects including zone information. Click on the "Import..." button. The "Import file" dialog box opens.
Select the MME file to be imported by double-clicking on it.
Your Infront Portfolio Manager also supports drag & drop here: Simply drag and drop *.mme files to be imported from Windows Explorer, the desktop or directly from an e-mail attachment into the analysis area. This file is then displayed in the "Import objects" dialog box and can be imported using the "Import" button.
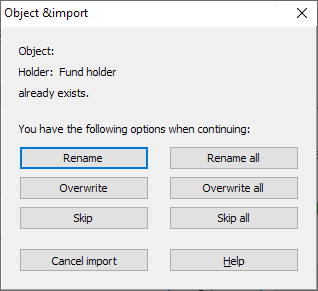
If there are already objects in your Infront Portfolio Manager that correspond to those in the import file, a new dialog box will appear. Choose between the following options:
Option Description Rename
The object to be imported is inserted under a different name; a consecutive number is appended to the name.
Both the old and the new object then exist in the database.
Rename all
All objects to be imported that already exist are inserted under different names; consecutive numbers are appended to the names.
Both old and new objects then exist in the database.
Overwrite
The existing object in the database is irrevocably overwritten by the object to be imported.
Overwrite all
The existing objects in the database are irrevocably overwritten by the objects to be imported.
Skip
The existing object is retained. It is skipped during object import.
Skip all
All existing objects are retained. They are skipped during object import.
Cancel import
The entire object import is completed.
Help
This command opens the context-sensitive online help.
After the import, the "Import log" shows which objects were imported, renamed or not imported.
The import log cannot be saved. In the case of an extensive log, it is advisable to mark the content, copy it with <CTRL>+<C> and paste it into a word processing program. You can then print or save the text.